Inhaltsverzeichnis
Vorwort
Es geht um eine bestehende Installation von NoSpamProxy (NSP) in Form von Intranet- und Gateway Rollen.
Bis dato hat der jeweils von mir verwendete Microsoft SQL Server keine verschlüsselte Datenbankverbindungen (encrypted Database Connections) unterstützt. Das wird sich nun zeitnah ändern.
In der Dokumentation von NSP konnte ich dazu nichts finden. Daher habe ich mich zusätzlich im NoSpamProxy Command Center umgeschaut. Dort gibt es unter Configuration -> NoSpamProxy components den Abschnitt „Databases“. Dort sehe ich die alle Datenbanken für die Intranet als auch Gateway Rollen. Dort habe ich jeweils einen Eintrag markiert und Modify angeklickt. Leider konnte ich dort keinen Parameter finden, um encrypted Connection zu aktivieren.
Realisierung
Nachstehend eine Zusammenfassung der verschiedenen Aktionen für die Nachwelt.
Bitte ggf. die Laufwerksbuchstaben und/oder Pfade zu den jeweiligen Dateien anpassen.
Intranet Rolle
Die SQL-Datenbank der Intranet Rolle liegt in diesem Fall auf einem Microsoft SQL Cluster (DAG). Daher erfolgt die Anmeldung der NoSpamProxy Intranet Rolle über einen SQL-Benutzerkonto. Dieses SQL-Benutzerkonto hat auf allen SQL-Servern innerhalb der DAG das gleiche Passwort.
1. Die Windows Dienste „NoSpamProxy – Intranet Role“ und „NoSpamProxy – Intranet Role WebApp“ stoppen.
Stop-Service -Name "NoSpamProxyWebApp"
Stop-Service -Name "NoSpamProxyIntranetRole"
2. Eine Sicherung der Datei „C:\ProgramData\Net at Work Mail Gateway\Configuration\Intranet Role.config“ anlegen.
Copy-Item -Path "C:\ProgramData\Net at Work Mail Gateway\Configuration\Intranet Role.config" -Destination "C:\ProgramData\Net at Work Mail Gateway\Configuration\Intranet Role.$(get-date -Format "yyyy-MM-dd_HH-mm-ss").config"
3. Die Datei „C:\ProgramData\Net at Work Mail Gateway\Configuration\Intranet Role.config“ im Editor (z.B. Notepad++) öffnen.
Aktuell/Bisher:

Überarbeitet/Neu:
<connectionStrings>
    <add name="Database" connectionString="Data Source=sql01prod.lab03.sub.domain.de;Initial Catalog=NoSpamProxyIntranetRole;User Id=nospamproxy_intranet;Password=password;MultipleActiveResultSets=true;Encrypt=True" />
  </connectionStrings>
4. Änderung in der Datei „C:\ProgramData\Net at Work Mail Gateway\Configuration\Intranet Role.config“ speichern.
5. Windows Dienste wieder starten.
Start-Service -Name "NoSpamProxyIntranetRole"
Start-Service -Name "NoSpamProxyWebApp"
Gateway Rolle
1. Den Windows Dienst „NoSpamProxy – Gateway Role“ stoppen.
Stop-Service -Name "NoSpamProxyGatewayRole"
2. Eine Sicherung der Datei „C:\ProgramData\Net at Work Mail Gateway\Configuration\Gateway Role.config“ anlegen.
Copy-Item -Path "C:\ProgramData\Net at Work Mail Gateway\Configuration\Gateway Role.config" -Destination "C:\ProgramData\Net at Work Mail Gateway\Configuration\Gateway Role.$(get-date -Format "yyyy-MM-dd_HH-mm-ss").config"
3. Die Datei „C:\ProgramData\Net at Work Mail Gateway\Configuration\Gateway Role.config“ im Editor (z.B. Notepad++) öffnen.
Aktuell/Bisher:

Überarbeitet/Neu:
<connectionStrings>
    <add name="NoSpamProxy" connectionString="Data Source=nspgw01a.lab03.sub.domain.de;Integrated Security=true;Initial Catalog=NoSpamProxyGatewayRole;MultipleActiveResultSets=True;Encrypt=True" />
  </connectionStrings>
4. Änderung in der Datei „C:\ProgramData\Net at Work Mail Gateway\Configuration\Gateway Role.config“ speichern.
5. Windows Dienste wieder starten.
Start-Service -Name "NoSpamProxyGatewayRole"
Web Portal Rolle
1. Die Windows Dienste „World Wide Web Publishing Service“ und „NoSpamProxy – Large File Synchronization stoppen.
Stop-Service -Name "W3SVC"
Stop-Service -Name "NoSpamProxyLargeFileSynchronization"
2. Eine Sicherung der Datei „D:\Program Files\NoSpamProxy\Web Portal\App_Data\WebPortal.config“ anlegen.
Copy-Item -Path "D:\Program Files\NoSpamProxy\Web Portal\App_Data\WebPortal.config" -Destination "D:\Program Files\NoSpamProxy\Web Portal\App_Data\WebPortal.$(get-date -Format "yyyy-MM-dd_HH-mm-ss").config"
3. Die Datei „D:\Program Files\NoSpamProxy\Web Portal\App_Data\WebPortal.config“ im Editor (z.B. Notepad++) öffnen.
Aktuell/Bisher:

Überarbeitet/Neu:
<connectionStrings>
  <add name="Database" connectionString="Data Source=nsplf01a.lab03.sub.domain.de;Integrated Security=true;Initial Catalog=NoSpamProxyWebPortal;MultipleActiveResultSets=True;Encrypt=True" />
</connectionStrings>
4. Änderung in der Datei „D:\Program Files\NoSpamProxy\Web Portal\App_Data\WebPortal.config“ speichern.
5. Windows Dienste wieder starten.
Start-Service -Name "W3SVC"
Start-Service -Name "NoSpamProxyLargeFileSynchronization"
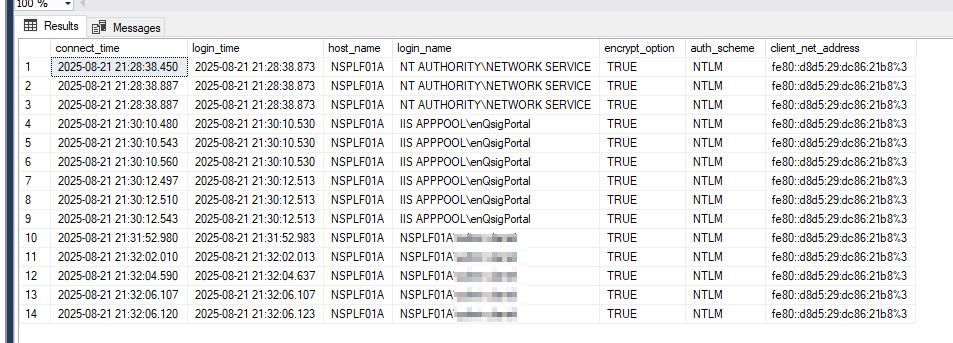
Nachstehend eine SQL-Abfrage, um zu prüfen ob die Verbindungen zur SQL-Datenbank „verschlüsselt/encrypted“ aufgebaut worden sind. Diese SQL Abfrage muss auf jedem SQL-Server, auf eine SQL-Datenbank einer NSP Rolle liegt, ausgeführt werden.
SELECT c.connect_time
 , s.login_time
 , s.host_name
 , s.login_name
 , c.encrypt_option
 , c.auth_scheme
 , c.client_net_address
FROM sys.dm_exec_connections AS c
   JOIN sys.dm_exec_sessions AS s ON c.session_id = s.session_id
Nachstehend exemplarisch das Ergebnis der obigen SQL-Abfrage auf dem SQL-Server für das Web Portal.
Wichtig sind die Werte in den Spalten „host_name“, „login_name“ und „encryt_option“:
Viel Spaß beim Ausprobieren. 🙂